Article sections
Are you using Google Tag Manager? In WP Google Analytics Events Pro Version 2.2.4, we officially added support for Google Tag Manager to the plugin.
Prior to this release, websites using Google Tag Manager couldn’t benefit from our plugin. But now that’s all changed.
Now, WP Google Analytics Events works great whether you’re using normal Google Analytics Events or Google Tag Manager.
But if you’d like to take advantage of WP Google Analytics Events with Google Tag Manager, you’ll need to complete a one-time set up before you can get out there and start tracking.
Here’s everything you need to do to get set up with the new Google Tag Manager integration…
How to Set Up Google Tag Manager With WP Google Analytics Events
Unfortunately, you can’t just tick a box to set up support for Google Tag Manager. But I promise you that the process is pretty painless! And once you get it set up, you’re good to go forever.
Note – this guide assumes you’re already using Google Tag Manager (that is, you have the Google Tag Manager code installed on your site already).
Step 1: Create New Custom Variables for WP Google Analytics Events
Log into Google Tag Manager and go to the site you’d like to set up with WP Google Analytics Events.
At a high level, you just need to create a custom tag for WP Google Analytics Events to use. But before you can do that…you need to set up some custom variables.
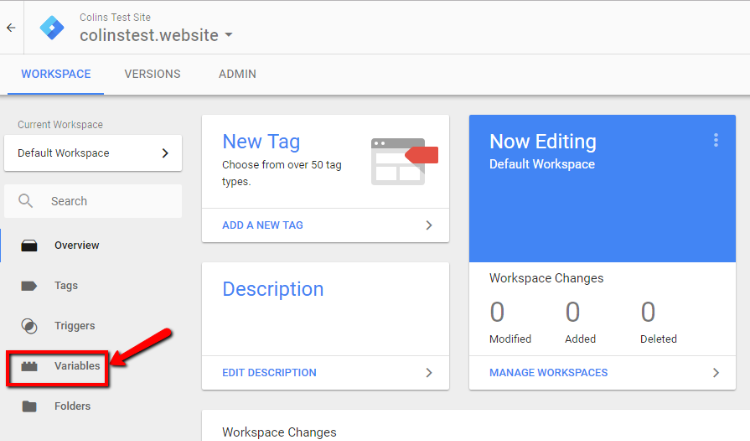
To get started, click on the Variables option in your Google Tag Manager sidebar:
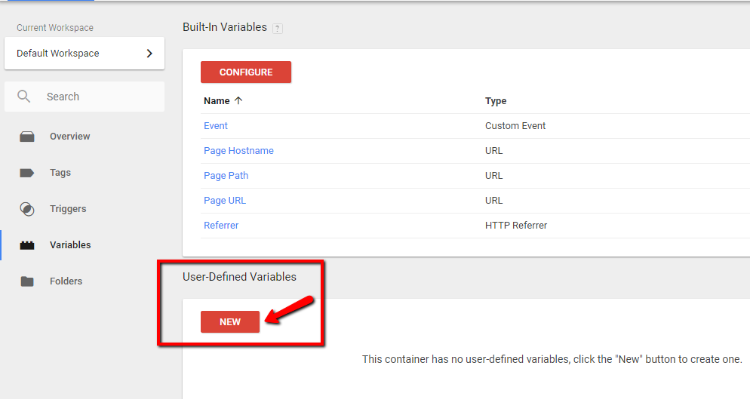
Then click New under the User-Defined Variables box:
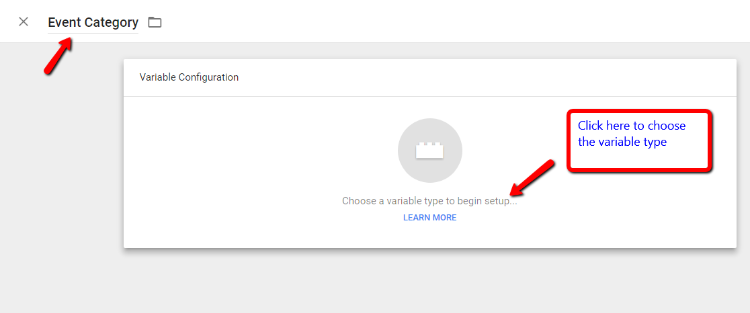
For your first label, name it Event Category. Then, click the box to choose the variable type:
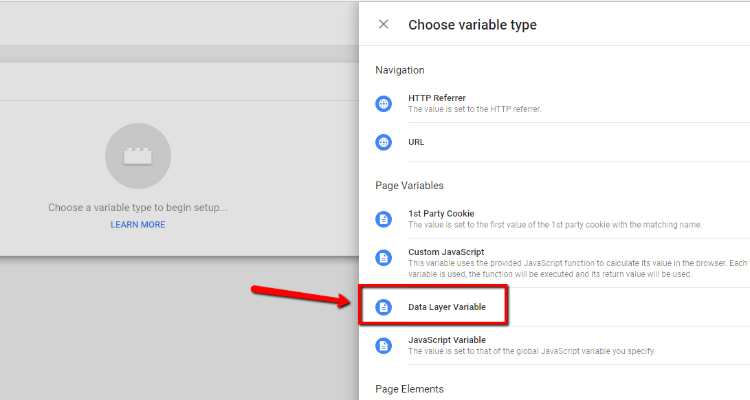
A Choose variable type sidebar should slide out. Select the Data Layer Variable option under Page Variables:
Make the Data Layer Variable Name equal to eventCategory. Be careful here – it’s very important that you get the name exactly right in order for the integration to function.
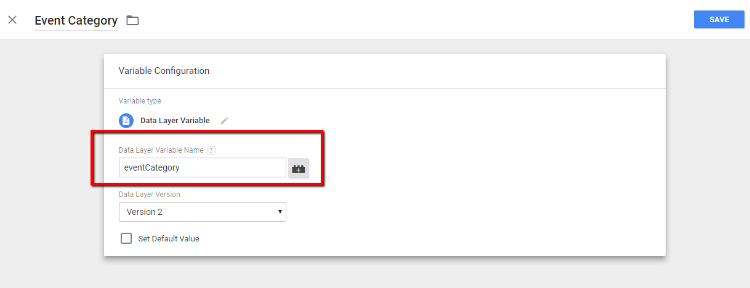
Then, click SAVE in the top right corner.
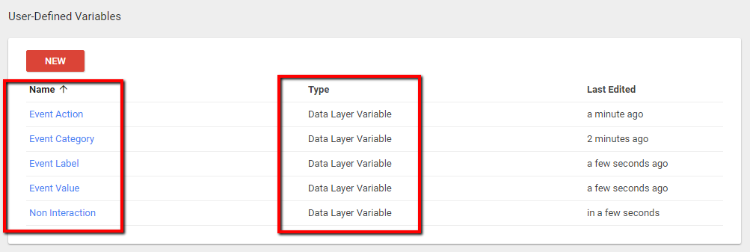
Now, you need to repeat the process for the rest of the variables. Here’s the information to use for each variable:
- Variable Name: Event Category – Data Layer Variable Name: eventCategory
- Variable Name: Event Action- Data Layer Variable Name: eventAction
- Variable Name: Event Label – Data Layer Variable Name: eventLabel
- Variable Name: Event Value – Data Layer Variable Name: eventValue
- Variable Name: Non Interaction – Data Layer Variable Name: nonInteraction
When you’re done, you should see something like this:
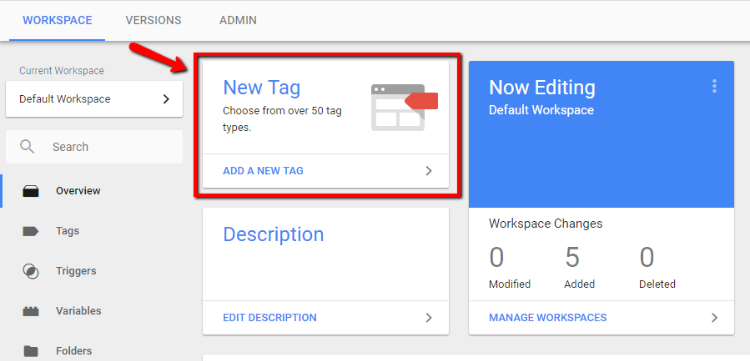
Step 2: Create a New Tag Using The Custom Variables
Once you’ve created all five custom variables, you’re ready to create your new tag. To do that, head back to your Google Tag Manager Dashboard and click on New Tag:
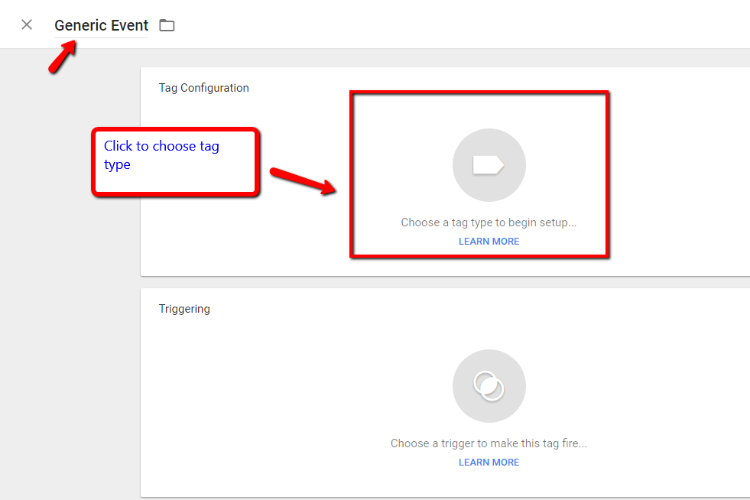
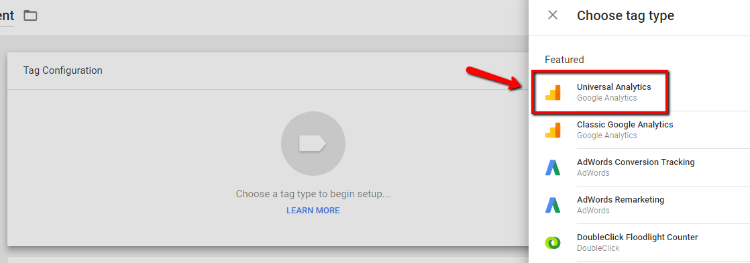
Name it Generic Event and then click to choose the Tag Type:
For the Tag Type, choose Universal Analytics:
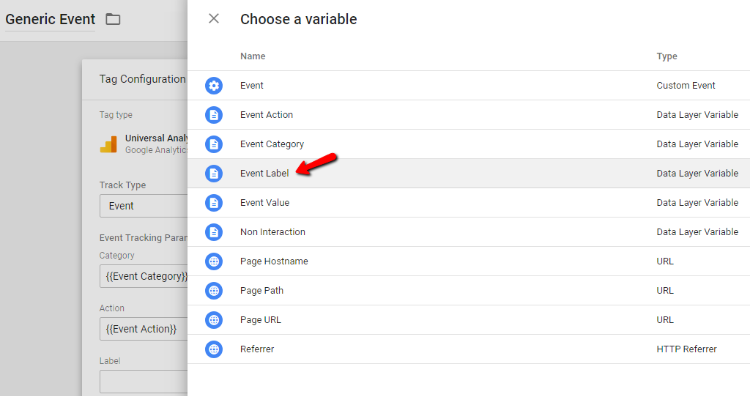
Then, set the Track Type to Event and click the button to select the custom variables you created in the previous step:
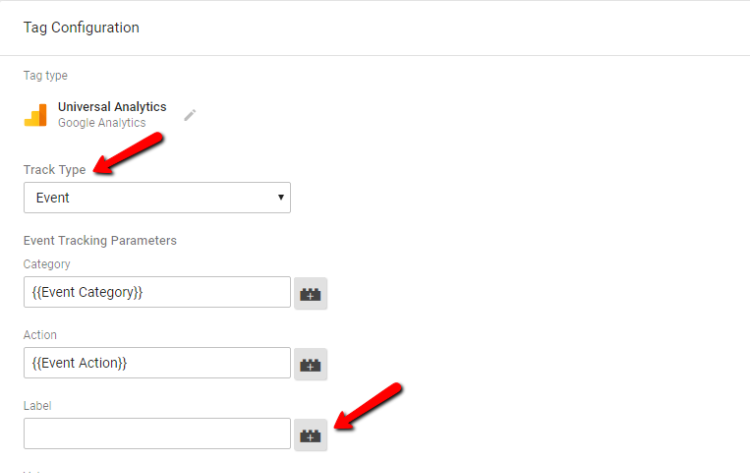
When you click the button, you’ll be able to simply select each variable. You don’t need to do this manually:
Make sure you also set the Non-Interaction Hit to your Non Interaction variable. And then, click Enable overriding settings in this tag to open the Tracking ID box and paste in your Google Analytics Tracking ID (here’s how to find your Google Analytics Tracking ID):
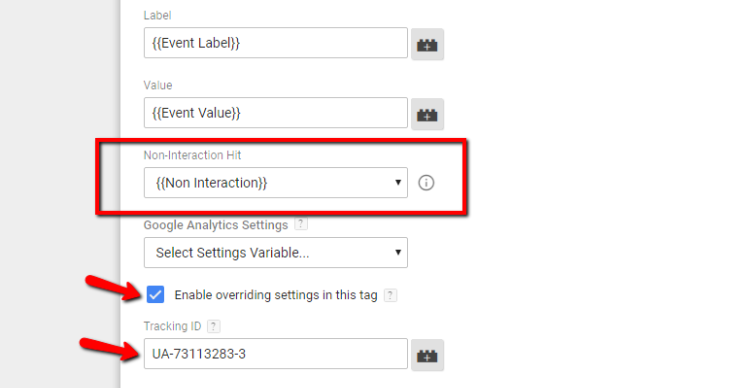
If you haven’t linked your Google Analytics account with Google Tag Manager, you might see the Tracking ID box in a slightly different location.
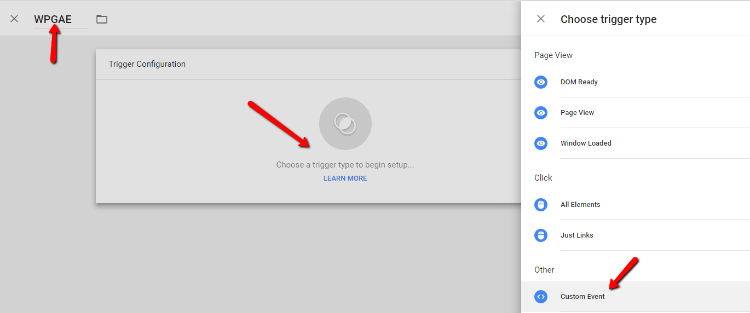
Then, click below to set up Triggering. Click the + sign in the top right:

Then, name your trigger WPGAE and click to choose the Trigger Type. Select the Custom Event type under Other:
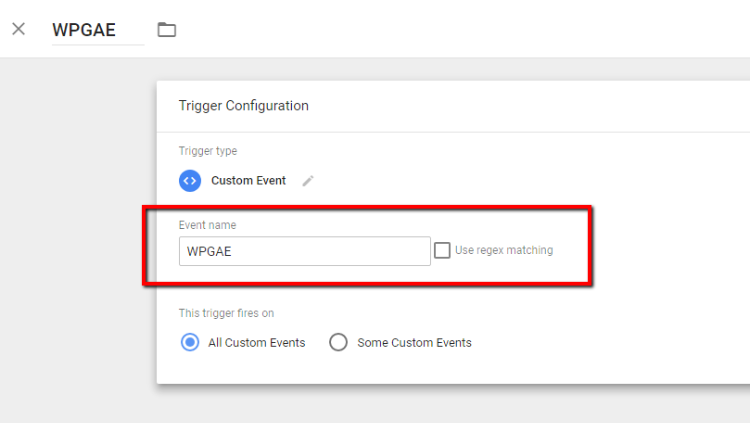
Then, name your Event name “WPGAE” (without quotes). It’s essential that the Event name is correct for the integration to work, so make sure there are no errors here:
Then, click Save in the top right (you’ll need to click Save twice to get back to your dashboard).
Step 3: Publish Your New Tag
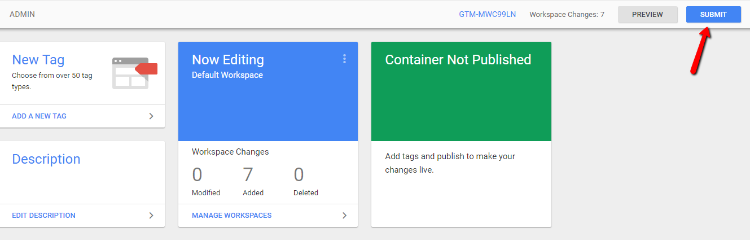
Now, you should be back in your dashboard. Almost done! You just need to Publish your tag to make it live.
To do that, hit Submit in the top right:
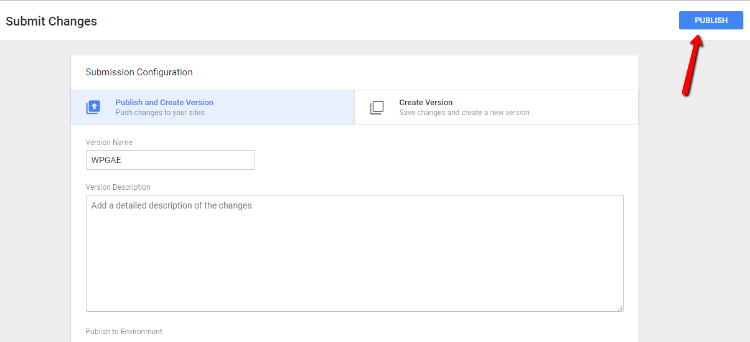
Name it something like WPGAE and then hit Publish in the top right:
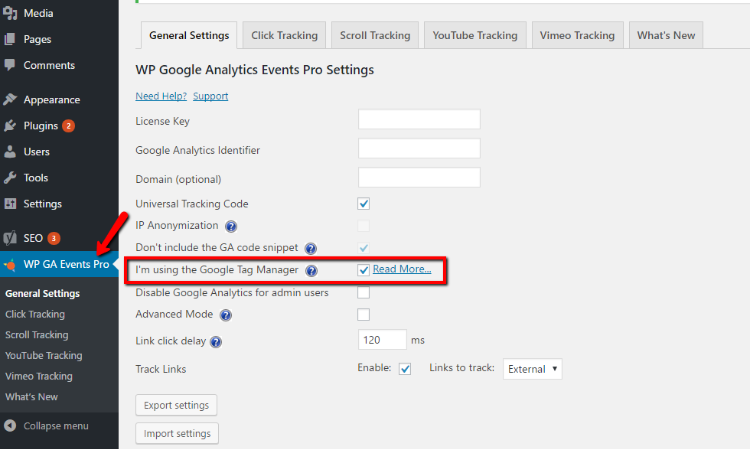
Step 4: Turn on Google Tag Manager Support in WPGAE WordPress Dashboard
Now, you’re pretty much done! All you need to do is go to WP Google Analytics Events in your WordPress site’s dashboard and check the box for I’m using the Google Tag Manager. Make sure to save your changes after you check the box:
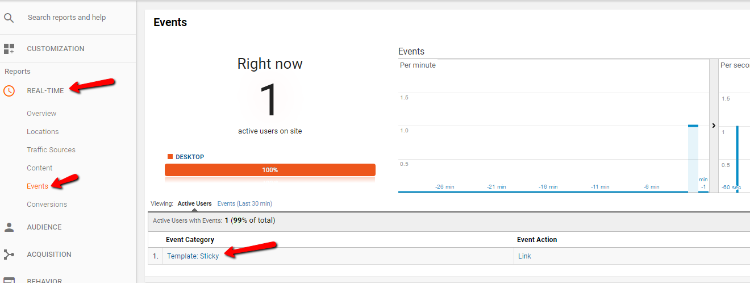
If you want to verify that everything is working properly, just set up some basic tracking in the plugin and verify that Google Analytics is collecting the event data by going to the Real-Time tab of your regular Google Analytics dashboard:
And that’s all there is to it! While the process might take you 20-30 minutes to get out of the way, once you’ve finished up this configuration, you’re done for good.
Now, you can use all of the cool features in WP Google Analytics Events with Google Tag Manager.